Photo by Ashley Batz
mitmproxy is a powerful proxy tool for debugging network requests and responses. It’s my favorite proxy tool and becoming one of my daily essential tools for working. I would like to share with you 3 mitmproxy tips you might not know about.
First things first, a small checklist:
- Do you know how mitmproxy works?
- Do you know how to install mitmproxy?
- Do you know how to install CA cert on a client side?
If these questions are way too easy for you and your answers are “Yes! Yes! Yes!”, then continue reading. Otherwise, please click and read the links above, and see you here later.
Tips 1: Custom configuration and key binding
One of the advantages of mitmproxy is highly customizable. It’s convenient to set up once configurations that every time mitmproxy loads them automatically when it starts. All the available handy options are in the mitmproxy document. Here is my ~/.mitmproxy/config.yaml:
|
|
As I’m using colemak keyboard layout, j and k keys are opposite for the navigation of up and down in mitmproxy. I have to change these 2 keys to make navigation smooth. Before, to change key bindings in old versions, I have to hack around code in defaultkeys.py. Since mitmproxy v4.0, custom key binding is finally officially supported! Here are my key bindings in ~/.mitmproxy/keys.yaml:
|
|
To know more about which command to use in cmd field, type K (shift + k) in mitmproxy. A list of current key bindings will show up. More information about key binging configuration is in the mitmproxy document.
Tips 2: Knowing client connection status when a filter is applied
It happens quite often to me: when I applied all filters in advance and then tried to connect a client to mitmproxy. However, there is nothing show up in the flow list. How do I know if it’s because the client is not connected to the proxy successfully or no requests are matching the filter?
A usual but not good way: Well, I have to remove the filter to see all requests. If I can see requests from the client, then I will again apply the filter…
An easy way is to add | .* in the filter, which will reveal all incoming requests. Yep, regex magic:
Another easy way is to simply type E (shift+e), which will open events logs. It shows the client connection status. Use q to quit events view:
Tips 3: Using mitmproxy as a mock server
The killer feature of mitmproxy is scripting. Using python scripts, all requests and responses are fully controlled and changeable on the fly. Besides that, mitmproxy is super robust to handle multiple clients simultaneously connected to one host. These features make mitmproxy a decent mock server. Therefore, I use mitmproxy a lot as a mock server.
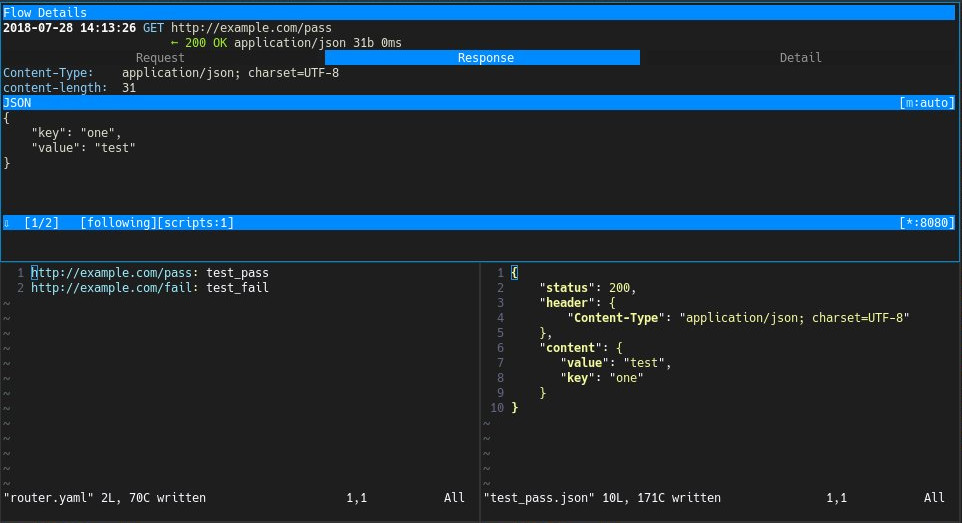
For example, a script for the purpose of rewriting and mocking response body, mitm-rewrite:
- Map
http://example.com/passtotest_pass.json(terminal on the bottom left) - Create mock response data in
test_pass.json(terminal on the bottom right) - Visit
http://example.com/passon the client side - The initial response is now replaced by the one in
test_pass.json(terminal on top)

If you want to know more useful scripts, I have a mitm-scripts collection to check out. If you want to make your own scripts, there are some examples.
Didn’t try mitmproxy yet? Get it a try. 😉
Know other mitmproxy tricks? Tell me more. 😍
